
 85242 85242 |
 35212 35212 |
|
|
||
|
|
|||||||
| Welcome to the Exploding Garrmondo Weiner Interactive Swiss Army Penis. |
|
GFF is a community of gaming and music enthusiasts. We have a team of dedicated moderators, constant member-organized activities, and plenty of custom features, including our unique journal system. If this is your first visit, be sure to check out the FAQ or our GFWiki. You will have to register before you can post. Membership is completely free (and gets rid of the pesky advertisement unit underneath this message).
|
 |
|
|
Thread Tools |
Member 1285 Level 26.51 Mar 2006 
|
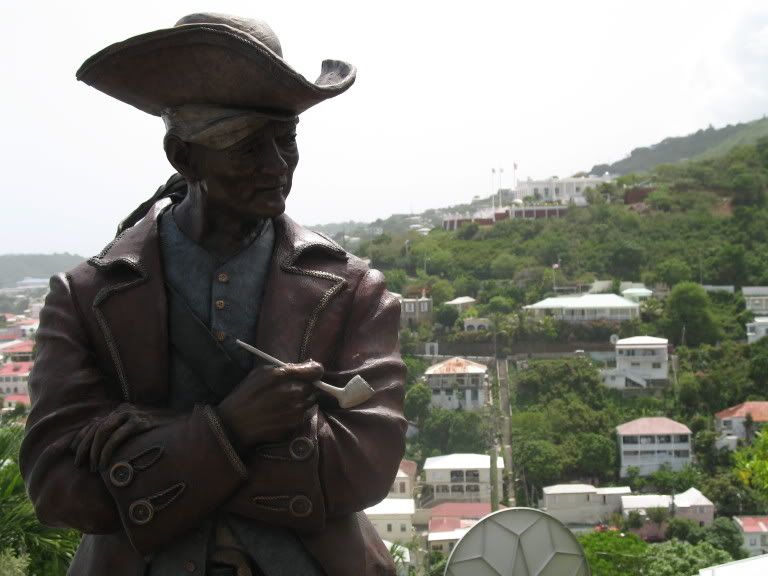
I really enjoy the pirate photo the most. One of my tips is to have taken it with a low aperture, preferably 1.4 if you have it or 2.8 is reasonable. The reasoning behind this is the same as Kazyl stated. Make the background blurry and keep the pirate in focus. It will really bring it out. You should do the same with your dog -- it will look less like a snapshot and more like an artsy photo.
Taking photos at different angles can help as well. For example, pay attention to backgrounds and such. For the pirate, I can see the back of a basketball hoop stand. That just looks terrible. An easy way to remedy this is to crop, but the problem is that you'll end up cutting off the arms. And the weather unfortunately cannot be helped, but an easy way of fixing that is to just insert your own in Photoshop or make the color of it bluer. You should also take the horses at a different angle as well. Those horses look like good photo subjects, but the people, cars, and hotel in the back are just plain snapshot-ty. What you could've done is crouch low beneath the statues and point the camera up to the sky, which is brilliantly blue. You might get wet in the process, but hey, it's a good photo. Just make sure your camera doesn't get wet. Overall, good set of pics, and they all can be remedied with PS. Double Post: Alright, here is my (bad) attempt to edit your pirate in PS. I'll go through a few steps of what I've done. Spoiler:
Spoiler:
Basically, I knew I couldn't use the lasso tool or the select tool to easily select the pirate, unfortunately. I really dislike using those tools to do that, so if anyone has a better idea, please tell us. So I first started with trying to get the sky. PS has a cool tool Filters>Renders>Clouds. Just pick a color. After that, I manually blurred the background. If I chose the time to lasso around the pirate, I could've used better techniques, such as filters, to better blur, such as under Filter>Noise for example. Then I used the dodge tool to make the face a little brighter. After that, use Curves to change the levels around, and I also used saturation to get the reds and blues of the statue out. Edit: I just looked over Kazyl's way to select. I'll try that right now and see how it works! Edit 2: Wow, that works wonders, but it takes a little patience and time. After you do the selection: Duplicate the layer, and select the bg. Cut it out and paste it into a new transparent workspace that is the same dimensions as the original pic. With that, I used Filer>Noise>Median at around 5 px for further blurring the background. Then I cut it out again and pasted it back onto the original pic. Select overlay or soft light or something that'll look good. That makes it a little more blurred. Then I just saturated the pirate a tad bit more. I hope this helps! Fiddling around can work wonders too. Jam it back in, in the dark.
Last edited by Dee; Jul 19, 2006 at 12:06 AM.
Reason: Automerged additional post.
|
Member 1285 Level 26.51 Mar 2006
|
I believe you can vary opacity with dodge and burn as well. Anyway, Piccolo's way is the same concept except the added advantage I see to it is that you can use different layering properties (like soft light, overlay, etc). Depends on what you are most comfortable with.
I like that animated gif there. Spiffy. And I noticed in the dog shot there are things on the sofa! Try to remove any unnecessary objects in the background. There's nowhere I can't reach. |
Member 1285 Level 26.51 Mar 2006
|
 I would've probably gotten an angle without background distractions. I would've probably gotten an angle without background distractions.This thing is sticky, and I don't like it. I don't appreciate it. |


 Dee
Dee